How to Store Tulip Bulbs After Flowering: Step-by-Step Guide
How to Store Tulip Bulbs After Flowering:
Complete Guide for Healthy Blooms Every Year
Tulips are among the world's most beloved spring flowers, but their beauty doesn't end when the blooms fade. Properly storing tulip bulbs after flowering is one of the most important steps for ensuring healthy plants and vibrant blooms the following season.
Whether you grow tulips in garden beds, raised borders, or containers, knowing when to dig up the bulbs, how to dry them, and the best way to store them can make the difference between strong, healthy flowers and disappointing results next spring.
In this complete guide, you'll learn everything you need to know about storing tulip bulbs after flowering, avoiding common mistakes, and preparing your bulbs for successful planting next season.
Quick Answer
The best way to store tulip bulbs is to dig them up only after the foliage has completely turned yellow, gently clean off excess soil, allow the bulbs to dry in a cool, shaded, well-ventilated place for several days, and then store them in paper bags, mesh bags, or cardboard boxes in a cool, dry location until autumn planting.



What You'll Learn
In this guide you'll discover:
When tulip bulbs should be lifted from the ground
Whether every tulip variety needs to be dug up
How to clean and dry bulbs correctly
The ideal storage temperature and humidity
Common storage mistakes to avoid
When to plant stored bulbs again for the best spring display
🌷 Expert Tip
Never store freshly dug tulip bulbs while they are still damp.
Even a small amount of trapped moisture can encourage mold, fungal diseases, and premature rotting during storage.
Why Proper Storage Matters
Tulip bulbs are living plants even while dormant. During summer storage they continue important biological processes that prepare them for next year's growth.
Poor storage conditions may lead to:
Mold and fungal infections
Bulb rot
Premature sprouting
Dehydration
Smaller flowers
Weak stems
Reduced blooming the following spring
Proper storage protects the bulb during its dormant period and allows it to conserve energy for healthy root development and strong spring flowers.
Do You Need to Dig Up Tulip Bulbs Every Year?
One of the most common questions gardeners ask is whether tulip bulbs must be lifted every year.
The answer depends on several factors.
In colder climates
Many perennial tulip varieties can remain in the ground for several years if the soil drains well and winters provide enough chilling hours.
In warmer climates
Gardeners in regions with mild winters often achieve better flowering by lifting the bulbs after the foliage dies back and storing them through the summer before replanting in autumn.
Hybrid tulips
Many modern hybrid tulips naturally produce smaller flowers after several seasons. Lifting, inspecting, and storing the bulbs helps maintain healthier plants and gives you the opportunity to remove damaged or diseased bulbs before replanting.
In the next section, we'll look at exactly when you should dig up tulip bulbs and how to recognize the perfect time.
🛒 Looking to start?
Check out the best tulip bulb packages on Amazon for fall planting
When Should You Dig Up Tulip Bulbs?
Knowing the right time to dig up tulip bulbs is one of the most important steps in successful bulb storage.
Many gardeners make the mistake of removing tulip bulbs too early, immediately after the flowers fade. However, the leaves still have an important job to do. After flowering, the plant continues collecting energy from sunlight and transferring nutrients back into the bulb.
This process helps the bulb prepare for the next growing season.
The correct moment to lift tulip bulbs is usually when:
the flowers have completely finished blooming;
the leaves begin turning yellow;
the foliage starts drying naturally;
the stems become softer and weaker.
In most climates, this happens approximately 6–8 weeks after flowering, depending on the tulip variety, weather conditions, and growing location.
Why You Should Not Cut Tulip Leaves Too Early
One of the most common mistakes beginners make is cutting the green leaves immediately after flowering.
Although the flowers have faded, the plant is not finished.
The leaves are still producing energy through photosynthesis. That energy travels back into the bulb and helps it develop strength for the following spring.
Removing the foliage too early can result in:
smaller flowers next year;
weaker bulbs;
reduced blooming;
fewer healthy offsets.
A simple rule:
Remove the flowers after blooming, but leave the leaves until they naturally turn yellow and die back.
Step-by-Step Guide: How to Store Tulip Bulbs After Flowering
Now that you know when tulip bulbs are ready to be lifted, let's go through the complete storage process step by step.
Step 1: Remove the Faded Flowers
After tulips finish blooming, remove the old flowers.
This process is called deadheading.
Removing faded flowers prevents the plant from spending energy producing seeds and allows more energy to return to the bulb.
When deadheading tulips:
cut only the flower head;
leave the leaves and stem intact;
avoid damaging the foliage.
This simple step helps the bulb store more energy during the remaining growing period.
Step 2: Wait Until the Leaves Turn Yellow
Patience is extremely important.
Do not dig up bulbs while the leaves are still completely green.
Wait until:
leaves become yellow;
foliage starts drying;
the plant looks naturally finished.
Although yellow leaves may look unattractive, this is a necessary part of the tulip's natural cycle.
Think of the leaves as the bulb's "solar panels" — they are charging the bulb before dormancy.
🌷 Expert Tip
Healthy tulip bulbs are created after flowering, not during flowering.
The weeks after blooming are when the plant stores the energy needed for next year's flowers.
Step 3: Dig Up the Tulip Bulbs Carefully
Once the foliage has died back, it is time to lift the bulbs from the soil.
Use a small garden fork or hand trowel and carefully loosen the soil around the plant.
Tips for safe digging:
dig several centimeters away from the stem;
avoid cutting into the bulb;
lift the soil gently;
shake off excess dirt.
Tulip bulbs can be easily damaged by sharp tools, and damaged bulbs are much more likely to develop rot during storage.
Step 4: Clean the Tulip Bulbs
After removing the bulbs from the ground, gently clean them.
Remove:
loose soil;
old outer layers that are already falling away;
dried roots;
damaged parts.
However, avoid washing the bulbs with water unless absolutely necessary.
Extra moisture can increase the risk of fungal problems during storage.
A dry bulb is a healthy bulb.
Step 5: Inspect Bulbs Before Storage
Before storing your tulip bulbs, check each one carefully.
Healthy bulbs should be:
✅ firm and solid
✅ dry on the outside
✅ free from mold
✅ without soft spots
Remove bulbs that show:
softness;
unpleasant smell;
visible mold;
dark damaged areas.
One unhealthy bulb can affect others during storage, so separating damaged bulbs is an important step.
Step 6: Dry Tulip Bulbs Before Storage
Drying is one of the most important stages.
Freshly lifted bulbs contain moisture from the soil. Before storage, they need time to dry naturally.
Place bulbs:
in a cool location;
away from direct sunlight;
with good air circulation.
A typical drying period is around several days to one week, depending on humidity and conditions.
Good drying locations include:
a shaded garage;
a garden shed;
a ventilated room;
a covered outdoor area protected from rain.
Avoid:
❌ direct summer sunlight
❌ hot enclosed spaces
❌ humid areas
Step 7: Prepare Tulip Bulbs for Storage
After the bulbs are completely dry, they are ready for storage.
Before placing them away:
label different varieties if needed;
separate different colors;
remove any remaining damaged bulbs;
check that they are completely dry.
Many gardeners store different tulip varieties separately because they bloom at different times and have different characteristics.
The Best Way to Store Tulip Bulbs:
Temperature, Containers and Storage Conditions
After tulip bulbs have been cleaned and dried properly, the next step is choosing the right storage method.
Good storage conditions protect the bulbs during their dormant period and help ensure strong growth when they are planted again in autumn.
The main goals of tulip bulb storage are:
keeping bulbs dry;
preventing mold and rot;
allowing good air circulation;
protecting bulbs from extreme temperatures;
keeping them dormant until planting time.
What Is the Ideal Temperature for Storing Tulip Bulbs?
Tulip bulbs prefer cool, dry storage conditions.
The ideal storage temperature is generally between:
10°C and 15°C (50°F–59°F)
The storage area should be:
✅ cool
✅ dark
✅ dry
✅ well ventilated
Avoid places where temperatures change dramatically.
Good storage locations may include:
a cool basement;
a dry garage;
a garden shed with stable temperatures;
a ventilated storage room.
Avoid:
❌ hot attics
❌ damp basements
❌ greenhouses during summer
❌ places exposed to direct sunlight
Choosing the Right Container for Tulip Bulbs
The container you choose plays an important role in keeping bulbs healthy.
Tulip bulbs need air circulation, so avoid completely sealed plastic containers.
Paper Bags
Paper bags are one of the easiest and most popular storage options.
Advantages:
allow airflow;
absorb small amounts of moisture;
are easy to label;
are inexpensive.
Write the tulip variety and color on each bag so you know what you are planting later.
Mesh Bags
Mesh bags are another excellent choice.
They allow:
maximum ventilation;
easy inspection;
good moisture control.
Many gardeners reuse small onion or garlic mesh bags for storing bulbs.
Cardboard Boxes
Cardboard boxes work well when storing larger quantities of bulbs.
For better results:
place bulbs in a single layer if possible;
separate layers with newspaper or dry paper;
keep the box in a dry location.
Why Plastic Bags Are Not Recommended
Plastic bags may seem convenient, but they often create problems.
Because plastic traps moisture, it can lead to:
mold growth;
fungal diseases;
soft and damaged bulbs;
bulb rot.
If plastic must be used temporarily, make sure there are ventilation holes and that bulbs are completely dry before storage.
However, breathable materials are always the better choice.
🌷 Expert Tip
Storage is not about keeping tulip bulbs warm — it is about protecting them from moisture.
A dry bulb in a cool place has a much better chance of producing beautiful flowers next spring.
Should Tulip Bulbs Be Stored in the Refrigerator?
Many gardeners ask whether tulip bulbs can be stored in a refrigerator.
The answer is: sometimes, but it depends on your situation.
Refrigerator storage is sometimes used by gardeners in warmer climates where natural winter chilling is insufficient.
However, there are important precautions:
keep bulbs away from fruits and vegetables;
avoid humid refrigerator drawers;
store bulbs in paper bags;
check them regularly.
Many fruits produce ethylene gas, which can negatively affect some plant materials.
For most gardeners in cooler regions, a naturally cool storage location is usually enough.
How Long Can Tulip Bulbs Be Stored?
Properly stored tulip bulbs can usually be kept safely for several months until the autumn planting season.
The exact storage time depends on:
bulb health;
storage conditions;
climate;
tulip variety.
The longer bulbs remain stored, the more important it becomes to maintain:
stable temperatures;
low humidity;
good ventilation.
Always inspect bulbs before planting and remove any that show signs of damage.
Checking Stored Tulip Bulbs During Storage
Do not simply forget about your bulbs after placing them into storage.
Every few weeks, check them carefully.
Look for:
✅ firm texture
✅ dry outer skin
✅ healthy appearance
Remove bulbs showing:
❌ mold
❌ softness
❌ unusual smell
❌ moisture buildup
Early detection helps prevent problems from spreading to healthy bulbs.
Common Mistakes When Storing Tulip Bulbs
Even experienced gardeners sometimes make storage mistakes.
Here are the most common problems:
Storing Wet Bulbs
This is the biggest mistake.
Bulbs that are not completely dry can quickly develop mold and rot.
Always allow enough drying time before storage.
Using Airtight Containers
Closed plastic containers prevent airflow and trap moisture.
Choose breathable storage materials instead.
Keeping Bulbs Too Warm
Warm temperatures can interrupt dormancy and encourage early sprouting.
Avoid hot rooms and direct sunlight.
Forgetting to Label Different Varieties
If you grow different tulips, unlabeled bulbs can become confusing.
Always label:
variety name;
flower color;
planting location.
Storing Damaged Bulbs Together With Healthy Ones
One rotten bulb can affect others.
Always separate and remove damaged bulbs before storage.
Tulip Bulb Storage Checklist
Before storing your bulbs, make sure:
✅ Flowers have finished blooming
✅ Leaves have naturally turned yellow
✅ Bulbs have been carefully lifted
✅ Soil has been removed
✅ Bulbs are completely dry
✅ Damaged bulbs have been removed
✅ Storage container allows airflow
✅ Location is cool and dry
When to Plant Stored Tulip Bulbs Again
After months of careful storage, the final step is returning your tulip bulbs to the garden.
Planting at the right time is essential because tulip bulbs need a period of cold temperatures to develop properly and produce beautiful spring flowers.
For most gardeners, the ideal planting period is autumn, several weeks before the ground freezes.
The Best Time to Plant Stored Tulip Bulbs
The exact planting time depends on your climate zone.
In cooler climates
Gardeners in regions with cold winters usually plant tulip bulbs during:
September;
October;
early November.
The goal is to give bulbs enough time to establish roots before winter arrives.
In warmer climates
Gardeners in warmer regions may need to provide artificial chilling before planting.
Tulips naturally require a cold period to prepare for spring growth.
In warmer areas, gardeners often:
chill bulbs before planting;
choose suitable tulip varieties;
plant later in the season.
For detailed planting information, see our complete guide:
When To Plant Tulip Bulbs: Complete Guide for US and UK Gardeners
Preparing Stored Tulip Bulbs Before Planting
Before placing stored bulbs into the soil, inspect them one final time.
Healthy bulbs should be:
✅ firm
✅ dry
✅ free from mold
✅ without soft areas
Remove any bulbs that show signs of damage.
A healthy bulb gives you the best chance of strong growth and beautiful flowers.
To make things easier, we have selected the highest-rated tulip bulb collections perfect for autumn soil:
View Tulip Bulb Offers on Amazon
Should You Soak Tulip Bulbs Before Planting?
Many gardeners wonder whether stored tulip bulbs should be soaked before planting.
In most cases, soaking is not necessary.
Healthy bulbs that have been stored correctly can be planted directly into prepared soil.
The most important factors are:
healthy bulbs;
correct planting depth;
good drainage;
proper planting time.
How Deep Should Stored Tulip Bulbs Be Planted?
Planting depth is important for protecting bulbs during winter and helping roots develop properly.
A general guideline is:
Plant tulip bulbs about 2–3 times deeper than the height of the bulb.
For many tulip varieties, this is approximately:
10–15 cm (4–6 inches) deep.
Always consider:
soil type;
climate;
bulb size;
local gardening conditions.
For more details, read:
The Importance of Well-Drained Soil
Even the healthiest stored bulbs can fail if planted in poor soil.
Tulips dislike standing water because excessive moisture can cause bulb problems.
The ideal soil should be:
loose;
fertile;
well-drained;
rich in organic matter.
If your garden soil is heavy clay, consider improving drainage before planting.
What Happens After Planting?
After planting, tulip bulbs begin developing roots before winter.
During the cold months, the bulbs remain dormant while preparing internally for spring growth.
When temperatures rise:
shoots emerge;
leaves develop;
flower buds form;
beautiful tulips bloom.
A healthy bulb storage process helps ensure this natural cycle continues successfully.
Tip: To get massive blooms next spring, don't forget to fertilize your bulbs. Check out our Complete Bulb Fertilizer Guide
Final Tulip Bulb Storage Checklist
Before storing:
✅ Wait until leaves naturally turn yellow
✅ Remove faded flowers
✅ Dig bulbs carefully
✅ Clean excess soil
✅ Inspect for damage
✅ Dry bulbs completely
During storage:
✅ Use breathable containers
✅ Keep bulbs cool and dry
✅ Provide good airflow
✅ Check bulbs regularly
Before planting:
✅ Inspect bulbs again
✅ Choose the correct planting time
✅ Prepare well-drained soil
✅ Plant at the correct depth
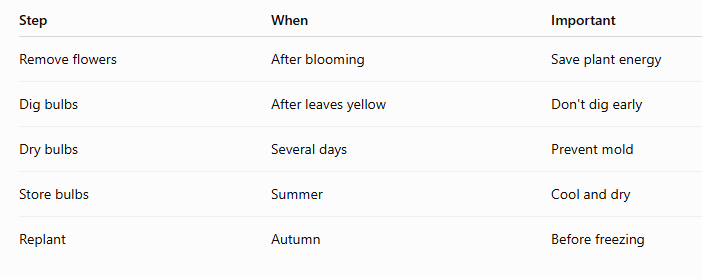
Tulip Bulb Storage At A Glance
Common Questions About Storing Tulip Bulbs
Can I store tulip bulbs after flowering?
Yes. Tulip bulbs can be stored after flowering if they are lifted at the correct time, dried properly, and kept in suitable conditions.
How long can tulip bulbs stay in storage?
Most tulip bulbs can be stored safely for several months until autumn planting.
Can I leave tulip bulbs in the ground?
Yes, some tulip varieties can remain in the ground for several years, especially in colder climates with suitable soil conditions.
Why are my stored tulip bulbs soft?
Soft bulbs are often a sign of moisture problems, fungal damage, or rot. Remove damaged bulbs to protect healthy ones.
Can tulip bulbs be stored in a refrigerator?
Yes, refrigerator storage can be useful in some warmer climates, but bulbs should be kept dry, ventilated, and away from fruits that produce ethylene gas.
Do tulip bulbs multiply?
Yes, tulip bulbs can produce smaller offsets around the main bulb. These offsets can eventually grow into flowering plants when they become mature.
Proper Storage Creates Better Tulips Every Year
Storing tulip bulbs after flowering is a simple process, but doing it correctly can greatly improve your success in the garden.
The most important principles are:
wait until foliage naturally dies back;
dry bulbs completely;
store them in cool, dry conditions;
use breathable containers;
inspect bulbs before replanting.
With proper care, your tulip bulbs can continue producing beautiful spring flowers year after year.
A little attention during the dormant season creates the foundation for a spectacular tulip display when spring arrives.
🌷 Happy gardening!
Continue Your Garden Academy Journey
Explore more expert guides:
🌷 The Complete Guide to Tulip Bulbs
🌷 Best Tulip Varieties
🌷 How Deep to Plant Tulip Bulbs
🌷 Growing Tulips in Pots
🌷 Tulips After Flowering
🌷 How to Store Tulip Bulbs After Flowering
🌷 Common Tulip Growing Problems
🌷 Buy Tulip Bulbs Online vs Local Stores | What’s Better?
🌷 Where to Buy Flower Bulbs Online (USA, UK & Europe Guide)
🌷 When to Plant Tulip Bulbs (Complete Guide for Beginners)
🌷 When To Plant Tulip Bulbs: Complete Guide for US and UK Gardeners

Growing Beauty, Everywhere





Growing Beauty, Everywhere
We help you find the best flower bulbs, seeds, and tools — tailored to your region.
Get your free updates & seasonal planting guides:


This website complies with GDPR
(EU General Data Protection Regulation)
Affiliate Disclosure:This site uses affiliate links. If you make a purchase through these links, we may earn a small commission at no additional cost to you. We only recommend products we trust.
Copyright EUFiori © 2026 All rights reserved. Email